Month: May 2025

After the Storm: Your Step-by-Step Guide to Roofing Insurance Claims

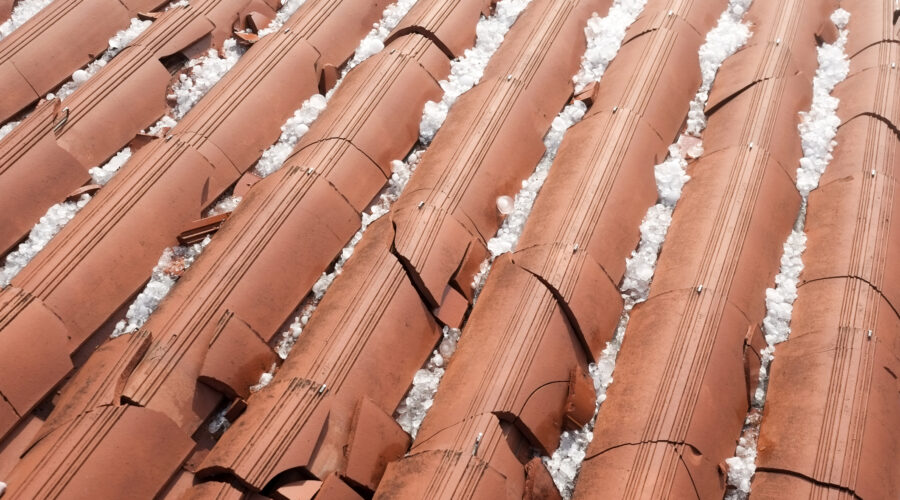
When a storm hits, your roof takes the brunt of the damage. Whether it’s heavy winds, pounding hail, or falling debris, storm-related roofing issues are not just inconvenient—they can quickly lead to leaks, water damage, and costly repairs. 

That’s why it’s crucial to act promptly, file your insurance claim accurately, and collaborate with a trusted contractor like Revolve Construction to ensure everything is repaired correctly.

Here’s your step-by-step guide to handling roofing insurance claims after a storm:

Step 1: Inspect for Damage as Soon as It’s Safe

Once the storm has passed, do a quick visual inspection from the ground. Look for:

  • Missing or curled shingles
  • Fallen tree branches or debris
  • Damaged gutters or flashing
  • Water stains on ceilings or walls

Even if your roof looks fine, hidden damage may still exist. That’s why the next step is so important.

Step 2: Schedule a Free Professional Inspection

Before you call your insurance company, call Revolve Construction. Our certified team provides a free, no-obligation roof inspection. We’ll safely climb onto your roof, document damage with photos, and check for signs that may not be visible from the ground.

Why call us before your insurance company? Because accurate documentation and expert input help you build a stronger, more complete claim from the start.

Step 3: File Your Insurance Claim

Once we confirm there’s storm-related damage, it’s time to contact your homeowner’s insurance company to file a claim. You’ll need:

  • Your policy number 
  • The date and time of the storm 
  • Photos and notes from our inspection 
  • A description of the damage 

Some insurance companies offer online portals, while others may require a phone call. Don’t worry—we’ll guide you through the entire process.

Step 4: Meet the Insurance Adjuster

Your insurer will send an adjuster to inspect the property and verify the damage. We’ll coordinate with you to ensure one of our experienced team members is present during the adjuster’s visit. This ensures:

  • Nothing is missed 
  • Damage is properly explained 
  • Your claim is taken seriously 

Our role is to advocate for you and make sure the adjuster sees the full picture.

Step 5: Review the Claim and Scope of Work

Once the insurance company approves your claim, they’ll issue a scope of work and an initial payment. At this stage, we’ll walk you through:

  • What’s covered 
  • What’s not 
  • Any additional concerns we’ve identified 
  • Material and color choices for your new roof 

Transparency is our priority. No surprises—just professional repairs done right.

Step 6: Begin Repairs with Revolve Construction

After everything is approved, we get to work. Our licensed, insured, and manufacturer-certified crews will:

  • Remove damaged roofing materials 
  • Replace with high-quality shingles (GAF, Owens Corning, etc.) 
  • Check for and repair decking or structural issues 
  • Ensure ventilation and flashing are properly installed 

We work quickly and cleanly, ensuring your property is protected throughout the process.

Book Your Free Storm Damage Inspection Today

Don’t wait. If a storm recently hit your area, protect your home—and your wallet—by booking a free inspection with Revolve Construction today. 

We’ll help you understand the damage, work with your insurance, and restore your roof with quality craftsmanship and clear communication. Contact Us today to get started.

Protect & Elevate Your Home with Top-Rated Siding Solutions

Your home’s exterior does more than just make a first impression—it protects what matters most. At Revolve Construction, we specialize in delivering premium siding and exterior services for homeowners and property managers across Missouri and Illinois

Whether you’re restoring storm damage or upgrading for better curb appeal, our expert team ensures your investment stands strong and looks great for years to come.

Why Exterior Siding Matters

Siding plays a critical role in protecting your home from the elements. It shields your interior from wind, rain, snow, pests, and moisture—all while regulating temperature and boosting energy efficiency. A well-installed siding system can:

  • Reduce heating and cooling costs>
  • Prevent mold and water damage
  • Increase property value
  • Enhance your home’s aesthetic

If your siding is cracked, warped, faded, or no longer performing, it’s time to consider a professional upgrade.

Our Siding & Exterior Services

At Revolve Construction, we bring over a decade of experience to every project. Our team is fully licensed, insured, and certified by leading manufacturers like James Hardie and LP SmartSide. We proudly offer:

1. Fiber Cement Siding

Known for its durability and resistance to fire, moisture, and insects, fiber cement siding like James Hardie is a popular choice for homeowners in Missouri and Illinois. It’s low-maintenance, long-lasting, and available in many textures and colors.

2. Vinyl Siding

Affordable, energy-efficient, and weather-resistant, vinyl siding is a go-to for many of our clients. It doesn’t peel or rot and requires minimal upkeep—making it ideal for busy families and property managers alike.

3. Engineered Wood Siding

If you want the look of natural wood without the downsides, engineered wood siding is an excellent option. It’s treated for moisture resistance and built to withstand harsh Midwestern climates.

4. Trim & Composite Panels

We also install architectural trim and composite panels to add dimension and definition to your exterior. These design features give your home a polished, high-end look while adding structural integrity.

5. Gutters, Soffits & Fascia

A complete siding project isn’t finished without attention to the details. We install durable gutters, soffits, and fascia systems that protect your roof and foundation from water damage.

Local Service with Regional Expertise

We proudly serve communities across Missouri, including St. Louis, Columbia, and Springfield, as well as Southern Illinois towns like Belleville, Edwardsville, and Alton. We understand the region’s extreme weather patterns—from summer storms to freezing winters—and tailor our siding solutions to withstand them all.

When you hire Revolve Construction, you’re not just getting a contractor. You’re getting a long-term partner who cares about protecting your home, your budget, and your peace of mind.

Start Your Exterior Transformation Today!

Whether you need a complete siding replacement or just want to explore exterior upgrades, Revolve Construction is here to help. We’ll assess your current setup, recommend the best materials for your goals and budget, and handle every step of the installation process with precision.

If you’re located in Missouri or Illinois and want siding that lasts, improves energy efficiency, and enhances your home’s curb appeal, Revolve Construction is your trusted local expert. Contact us today or request a free quote online to begin your siding and exterior transformation.

How Hail Can Damage Your Roof Without Causing a Leak

When a hailstorm rolls through your area, the first thing most property owners check for is obvious damage — broken windows, dented siding, or water leaking from the ceiling. If everything looks fine on the surface, it’s easy to assume your roof survived unscathed.

But here’s the catch: hail damage isn’t always immediate or visible, and just because your roof isn’t leaking now doesn’t mean everything is okay.

At Revolve Construction, we’ve inspected thousands of roofs across Missouri and Illinois after severe storms. Time and again, we find that hail damage flies under the radar — until it’s too late and costly repairs are needed.

In this guide, we’ll break down exactly what hail does to your roofing system, why leaks may not show up right away, and why it’s critical to take action even if your roof looks fine.

How Hail Actually Damages a Roof

It’s More Than Just Dents

While hail can cause noticeable dents and cracks, some of the most serious damage happens beneath the surface. A standard hailstone may not seem like much, but when it slams into your roof at 60+ mph, it can compromise the system’s integrity.

Here’s how:

  • Bruising of Shingles: Hail impacts can bruise or compress the protective granules on asphalt shingles, exposing the underlayment to the elements.
  • Cracks or Splits: For older roofs, hail may cause cracking or splitting of shingles and tiles.
  • Loss of Granules: Granules provide UV protection and fire resistance. Hail can knock them off, speeding up aging.
  • Membrane Punctures: On flat roofs (like TPO or EPDM), hail can puncture or weaken the membrane, even without visible tears.

Why You Might Not See Leaks — Yet

Delayed Water Intrusion Is Common

One of the biggest misconceptions is that if your roof isn’t leaking immediately after a hailstorm, it must be fine. In reality, hail damage often sets the stage for leaks that can develop weeks, months, or even years later.

Here’s why:

  • Protective layers are compromised, but not fully breached — yet.
  • Small cracks or gaps allow slow moisture intrusion that builds up over time.
  • UV exposure worsens damage where granules have been knocked away, accelerating decay.
  • Interior leaks can be hidden inside walls, insulation, or attics before becoming visible.

Signs of Hail Damage to Watch For

Even if you’re not seeing leaks, keep an eye out for these warning signs:

  • Dark or bald spots on shingles
  • Dents in gutters, downspouts, or metal flashing
  • Loose or missing shingle tabs
  • Cracked skylights or vent covers
  • Granules collecting in gutters

And remember: if your neighbors are getting inspections or repairs, there’s a good chance your property was affected, too.

Why Timely Inspections Matter

The longer you wait to address hail damage, the more expensive it becomes. Insurance companies also limit how long you have to file a claim after a storm — typically 6 to 12 months.

Benefits of Getting a Roof Inspection Right Away:

  • Catch damage early before it leads to interior problems
  • Protect your insurance rights by filing on time
  • Get professional documentation for your claim
  • Prevent small issues from becoming major repairs

At Revolve Construction, we provide free hail damage assessments — no pressure, no gimmicks. Just honest insights from trained professionals.

TPO, EPDM, and Shingle Roofs: How They Respond to Hail

Roof Type

Common Hail Damage

How It Progresses

Inspection Tip

Asphalt Shingles

Granule loss, bruising, cracks

UV exposure worsens damage

Look for dark or smooth patches

TPO Membrane

Surface dents, seam separation

Can lead to leaks over time

Check seams and around penetrations

EPDM Rubber

Punctures, uplifted edges

May bubble or blister later

Look for signs of membrane loosening

Still Not Sure If You Have Damage? Ask Yourself:

  1. Did a hailstorm pass through your area recently?
    If yes, even a quick inspection is worth it.
  2. Is your roof more than 5 years old?
    Older roofs are more vulnerable to hail damage.
  3. Have neighbors filed claims or gotten repairs?
    Nearby damage usually means yours was impacted too.
  4. Can you see granules in your gutters or downspouts?
    This could signal hail has stripped the shingles.

Final Thoughts

Hail damage doesn’t always cause immediate leaks — but that’s exactly what makes it dangerous. Left unaddressed, even minor hail impacts can lead to major water damage, mold growth, and costly repairs down the road.

At Revolve Construction, we help property owners take the smart, proactive approach. Our trained inspectors know exactly what to look for — and how to document damage clearly for insurance claims.

Think your roof might have hail damage? Don’t wait for the first drip to take action.

Contact Revolve Construction today for a free inspection — and peace of mind

The 5 Most Common Insurance Claim Mistakes and How to Prevent Them

When disaster strikes your home or business — whether it’s storm damage, fire, theft, or a burst pipe — your insurance policy should be your safety net. But filing an insurance claim isn’t always as simple as it sounds. In fact, one small mistake in the process can delay your payout, reduce the amount you receive, or even lead to a denied claim.

At Revolve Construction, we’ve worked with property owners across Missouri and Illinois through every phase of the restoration process. We’ve seen firsthand how avoidable errors can complicate claims — and how the right guidance can make all the difference.

In this guide, we’ll break down the 5 most common insurance claim mistakes we see — and share practical ways to avoid them. Whether you’re facing damage right now or simply want to be prepared for the future, this is essential reading for any property owner.

Mistake #1: Waiting Too Long to File a Claim

The Problem:

Time is not on your side when it comes to insurance claims. Delaying your claim can raise red flags with your provider or fall outside the policy’s filing window.

Why It Matters:

Most insurance companies require that you report damage “promptly” — and what counts as “prompt” varies. Waiting too long can lead to claim denials or reduced payouts.

How to Avoid It:

  • Report damage as soon as it’s safe to do so.
  • Document the date of the incident and the condition of the property right away.
  • Don’t wait until repairs are complete — initiate the claim first.

Mistake #2: Failing to Document the Damage Properly

The Problem:

Insurance is all about evidence. If you don’t have clear, dated proof of the damage, your claim may be weakened.

Why It Matters:

Adjusters rely on photos, videos, and written records to verify the extent and cause of damage. Without proper documentation, you risk underpayment or outright denial.

How to Avoid It:

  • Take clear, timestamped photos of all affected areas.
  • Record videos to capture the full scope of the damage.
  • Keep receipts, repair estimates, and a detailed log of all communications.

Mistake #3: Throwing Away Damaged Items Too Soon

The Problem:

Many people clean up quickly after an incident — but tossing damaged materials before the adjuster visits can remove vital evidence.

Why It Matters:

Your insurer may want to inspect the damaged items or materials. Without them, it’s harder to validate your loss.

How to Avoid It:

  • Leave everything in place until the adjuster arrives, if possible.
  • If you must remove something for safety reasons, photograph it thoroughly first.
  • Keep any small damaged items in a labeled box for inspection.

Mistake #4: Not Reviewing Your Policy Ahead of Time

The Problem:

Many property owners don’t fully understand what their policy covers — or doesn’t cover — until it’s too late.

Why It Matters:

Assuming you’re covered can lead to unexpected out-of-pocket costs. Some policies have exclusions, coverage limits, or specific deductibles depending on the type of loss.

How to Avoid It:

  • Read through your policy before you need it — not after.
  • Pay attention to coverage limits, deductibles, and exclusions.
  • Ask your insurance agent or a claims specialist to explain anything unclear.

Mistake #5: Accepting the First Settlement Offer Without Question

The Problem:

Insurance companies often make an initial offer that may not fully cover your repair or replacement costs. Many people accept it without realizing they have options.

Why It Matters:

You could be leaving thousands of dollars on the table — or settling for subpar repairs.

How to Avoid It:

  • Don’t rush to accept the first offer.
  • Get independent estimates from licensed contractors.
  • You have the right to negotiate or request a reassessment.

Quick Reference: Top 5 Mistakes & Fixes

Mistake

Why It’s a Problem

How to Prevent It

Waiting too long to file

Misses claim deadline

File as soon as damage occurs

Poor documentation

Weakens your claim

Take timestamped photos and videos

Throwing away evidence

Removes proof of loss

Keep damaged items for inspection

Not knowing your policy

Leads to surprise costs

Review and ask questions beforehand

Accepting first offer

May underpay your claim

Get second opinions, negotiate

Questions to Ask Yourself Before Filing a Claim

  1. Have I documented the damage thoroughly?
    If not, start with photos and videos from multiple angles.
  2. Do I understand what my policy actually covers?
    Review your policy or talk with your insurance rep before filing.
  3. Have I contacted a trusted contractor?
    Getting an independent damage assessment helps during negotiations.
  4. Am I within the policy’s time limits for filing?
    Check your coverage to ensure you’re still eligible to file.

Final Thoughts

Filing an insurance claim can feel overwhelming — especially after experiencing property damage. But by avoiding these common mistakes, you can protect your rights, secure a fair settlement, and get your property back to normal faster.

At Revolve Construction, we do more than just rebuild — we guide clients through the insurance process to ensure nothing gets missed. Whether you’re dealing with storm damage, water leaks, or fire recovery, our experienced team is here to help you file with confidence and get the compensation you deserve.

Need help with a claim or repair? Contact Revolve Construction today — we’re on your side from start to finish.

TPO vs. EPDM: Which Commercial Roofing System Is Right for You?

When you’re running a business or managing a commercial property, your roof does more than just keep the rain out — it protects your operations, your assets, your employees, and your bottom line. That’s why choosing the right commercial roofing system is one of the most important decisions you’ll make. At Revolve Construction, we specialize in helping business owners across Missouri and Illinois make smart, long-term roofing choices that align with performance goals and budget.

Two of the most widely used flat and low-slope commercial roofing systems today are TPO (Thermoplastic Polyolefin) and EPDM (Ethylene Propylene Diene Monomer). While both materials have proven track records, they offer different advantages when it comes to cost, durability, energy efficiency, and installation.

So, how do you decide which system is right for your property?
Whether you’re planning a new build, replacing an aging roof, or recovering from storm damage, this guide will walk you through the key differences between TPO and EPDM.

At Revolve Construction, we don’t just install roofing systems — we partner with property owners to build solutions that last.

What Is TPO Roofing?

TPO roofing is a single-ply white membrane made from a blend of rubber and plastic. It’s usually heat-welded at the seams and installed in large sheets across flat or low-slope commercial roofs.

Key Features of TPO:

  • Bright white surface reflects sunlight
  • Heat-welded seams for strong waterproofing
  • Resistant to UV rays, dirt, and algae
  • Lightweight and flexible
  • Energy-efficient

What Is EPDM Roofing?

EPDM roofing is a single-ply black rubber membrane, similar to a big inner tube laid over your building. It’s installed using adhesive or ballasted with stone or pavers.

Key Features of EPDM:

  • Long-lasting rubber material
  • Seamless or minimal seam options
  • Resistant to UV damage and weathering
  • Low maintenance
  • Cost-effective

TPO vs. EPDM: Side-by-Side Comparison

FeatureTPOEPDM
ColorWhite (reflective)Black (absorbs heat)
Energy EfficiencyReflects heat (cooler building)Absorbs heat (warmer building)
InstallationHeat-welded or mechanically fastenedAdhered or ballasted
CostSlightly more expensiveUsually more affordable
Durability15–20 years (with proper care)20–30 years (with proper care)
Weather ResistanceExcellent UV and chemical resistanceGreat for cold climates
Best Use CaseHot climates, energy savingsCold climates, budget-friendly

Benefits of TPO Roofing

1. Energy Savings

TPO’s white surface reflects sunlight and helps keep your building cooler in the summer. This can reduce your air conditioning costs and make your building more energy-efficient.

2. Strong Seams

TPO roofs are heat-welded at the seams, which creates a watertight seal that’s less likely to fail compared to glued seams. This is especially useful in areas with heavy rainfall.

3. Lightweight & Flexible

TPO is easier to install on a variety of roof structures. Its lightweight material puts less stress on the building’s frame.

4. Eco-Friendly

Many TPO roofs are recyclable, making them a better choice for environmentally-conscious businesses.

Benefits of EPDM Roofing

1. Budget-Friendly

EPDM is generally more affordable than TPO, both in materials and labor. If you’re looking for cost-effective durability, this might be your best option.

2. Proven Longevity

EPDM has been used in the roofing industry for decades. When properly installed and maintained, EPDM roofs can last up to 30 years.

3. Performs Well in Cold Climates

Black rubber naturally absorbs heat, which can help reduce heating costs during winter months. It’s also less likely to crack in freezing temperatures.

4. Easy Repairs

In case of damage, EPDM is easy to repair with rubber patches or liquid coatings. Repairs can often be done quickly and inexpensively.

Which One Is Right for Your Building?

Let’s help you decide by asking a few simple questions.

1. What’s the climate like in your area?

  • If you’re in a hot or sunny climate, go with TPO. Its reflective surface keeps buildings cooler.
  • If you’re in a cold climate, EPDM helps retain heat better.

2. What’s your budget?

  • EPDM is more cost-effective upfront and easier to install.
  • TPO may cost slightly more but can save on cooling costs over time.

3. How important is energy efficiency?

  • TPO is ideal for buildings looking to qualify for ENERGY STAR® certifications or LEED points.
  • EPDM still offers efficiency, but mainly for heating rather than cooling.

4. Do you need a roof that’s easy to maintain?

  • EPDM is easier to patch and repair.
  • TPO has stronger seams but might need a professional to fix any issues.

What About Lifespan?

  • TPO roofs typically last 15 to 20 years, though newer formulations are improving durability.
  • EPDM roofs often last 20 to 30 years with proper maintenance.

Both systems can perform well if installed correctly — the key is choosing a trusted roofing contractor with experience in commercial.

Final Thoughts

There’s no “one size fits all” when it comes to commercial roofing. Both TPO and EPDM offer solid protection, durability, and performance. The right choice depends on your building type, local climate, energy goals, and budget.

Need help making the final decision? A licensed commercial roofer can inspect your property and recommend the best system for your needs.

At Revolve Construction, we specialize in both TPO and EPDM roofing systems for commercial buildings. Whether you’re building new, replacing an old roof, or just exploring your options, our team is here to help.

Scroll to top